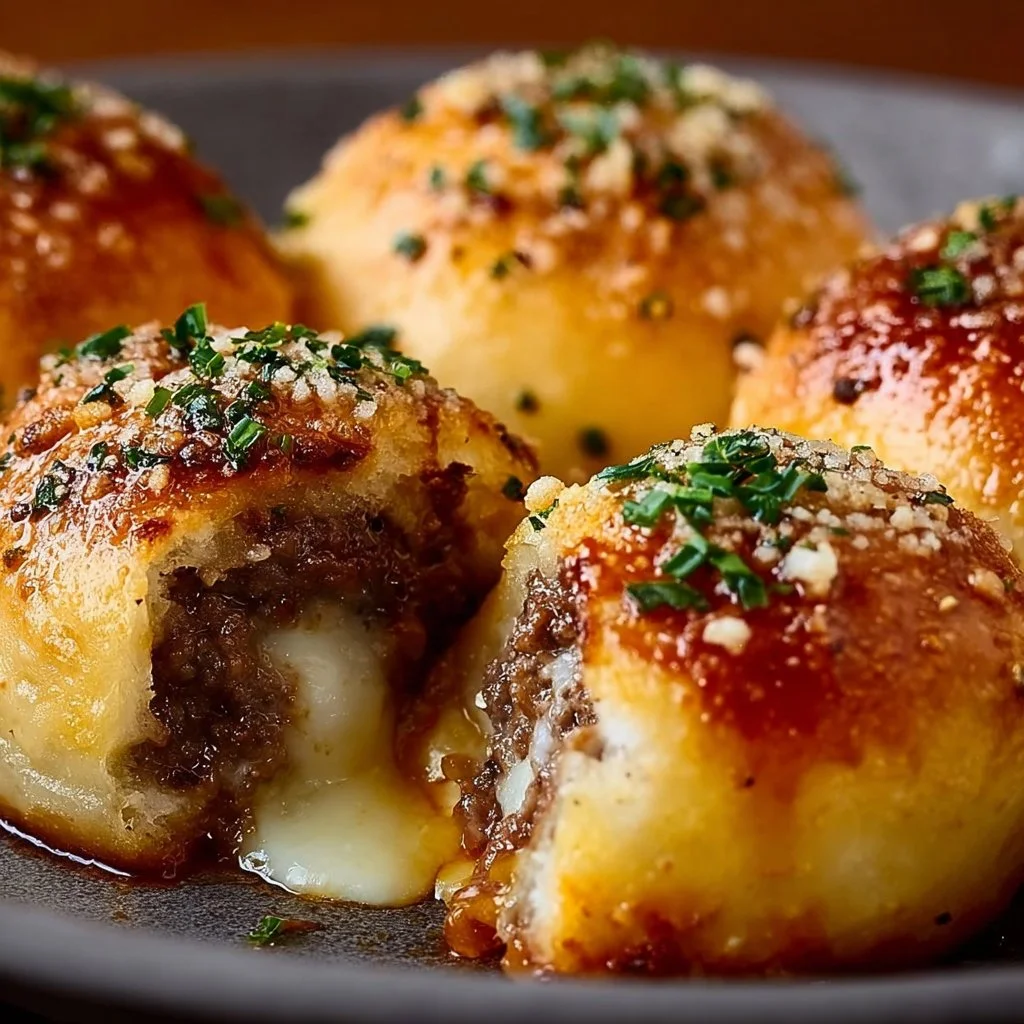
Garlic Parmesan Cheeseburger Bombs
Who can resist the smell of garlic and cheese wafting through the kitchen?
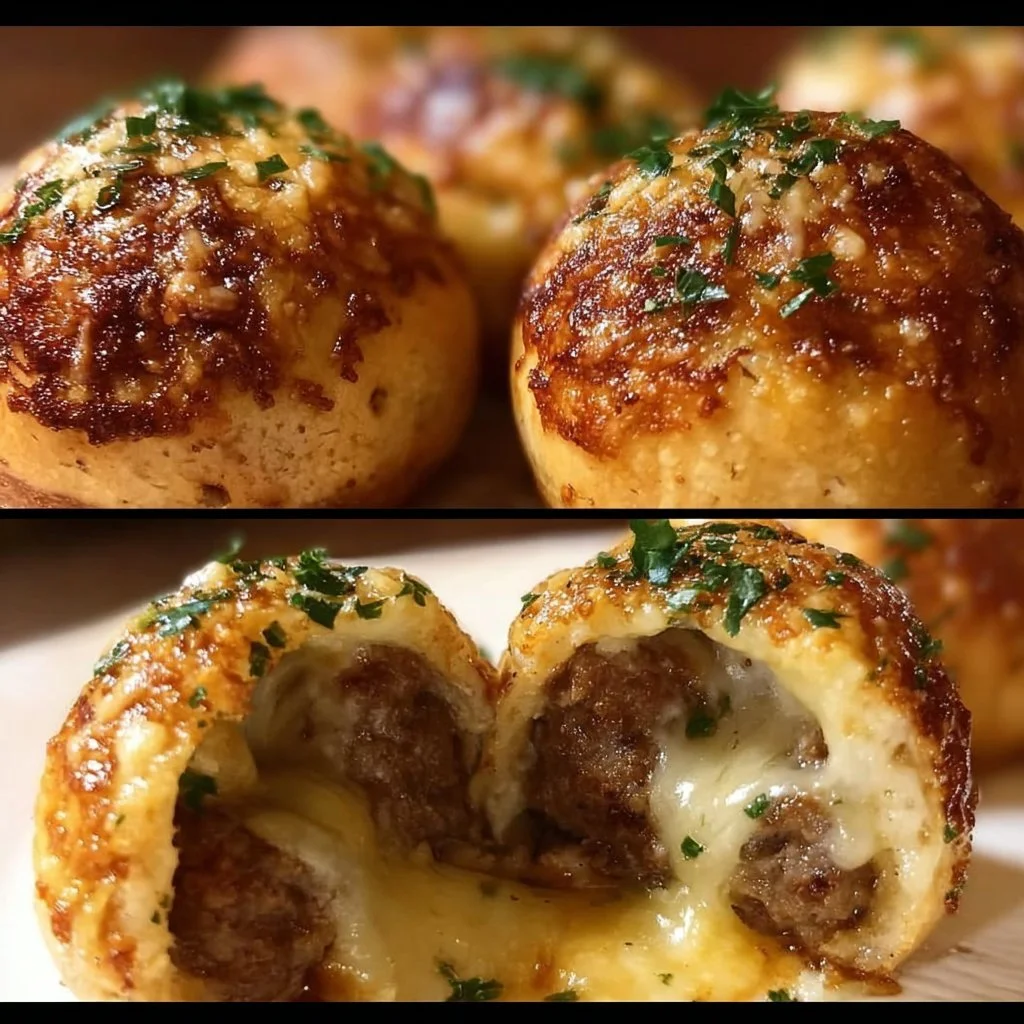
These Garlic Parmesan Cheeseburger Bombs are not just your average snack; they’re little pockets of joy that pack a punch of flavor! Picture crispy biscuit dough wrapped around a gooey melty cheese and savory beef filling. What’s even better? They’re super quick to make and perfect for any gathering!
Why make this recipe
You’re going to love these for several reasons! First up, easy cleanup—who has time for a mountain of dishes? Second, they’re family-friendly, making them a guaranteed hit with kids and adults alike. Plus, these tasty bites are surprisingly affordable—perfect when you’re on a tight budget but still want to impress. And honestly, what’s better than a meal that’s ready in no time?
Ingredients:
You don’t need fancy stuff — just these basics!
- 1 pound ground beef
- 1 cup cheddar cheese, shredded
- 1 can biscuit dough
- 2 cloves garlic, minced
- 1/4 cup grated parmesan cheese
- Salt and pepper to taste
- Dipping sauces (optional)
Directions
- Preheat the oven according to the biscuit dough package instructions.
- Cook the ground beef in a skillet over medium heat until browned.
- Drain the fat, then mix in the minced garlic, salt, and pepper.
- Remove from heat and stir in the shredded cheddar cheese until melted.
- Roll out each piece of biscuit dough and place a spoonful of the beef and cheese mixture in the center.
- Fold the dough over the filling and seal the edges.
- Place the filled bombs on a baking sheet and sprinkle with parmesan cheese.
- Bake according to the biscuit package instructions until golden brown.
- Serve warm with your favorite dipping sauces!
How to make Garlic Parmesan Cheeseburger Bombs (Overview)
Making these little bombs is a breeze! Start by browning the beef and mixing it with garlic—this aromatic step sets the stage for deliciousness. While that’s cooking, roll out your biscuit dough into cute little pockets, ready to hold a beef-cheese treasure. Pro tip: Don’t skip toasting the garlic—toasting intensifies that fantastic flavor! Once they’re baked to golden perfection, your kitchen will smell like a gourmet restaurant. Seriously, get ready for all the compliments!
How to serve Garlic Parmesan Cheeseburger Bombs
These bombs are perfect for any occasion! Serve them warm as a party appetizer, or make them the main event of your next family movie night. Imagine biting into a crispy bomb, cheese bubbling inside, while dipping it into ranch or spicy ketchup. 🤤 The golden-brown color and cheesy aroma will make everyone rush to the table!
How to store Garlic Parmesan Cheeseburger Bombs
Got leftovers? These little goodies keep well in the fridge for about 3–4 days. Just store them in an airtight container to keep that crunch! For longer storage, you can freeze them for up to 2 months. Reheat in the oven to restore their crispy goodness – microwaves can make them sad and soggy. 😢
Tips to make Garlic Parmesan Cheeseburger Bombs
- Make it ahead: You can prepare the filling a day in advance to save time!
- Substitute meats: Feel free to swap in ground turkey or chicken for a lighter option.
- Experiment with cheese: Try mixing in pepper jack or mozzarella for a twist on the flavor.
- Taste test: Always adjust salt and pepper to your liking; taste as you go!
- Don’t overstuff: Less is often more—too much filling can burst your bombs!
Variation
Want to kick things up a notch? Try adding jalapeños for some heat, or make it a vegan option by using plant-based ground meat and vegan cheese. You can also experiment by adding sautéed onions or mushrooms for a gourmet touch. The possibilities are endless!
FAQs
Can I use store-bought cheese sauce instead of shredded cheese?
Sure! Just remember, it’ll give a different texture. Go for a thicker sauce so it doesn’t spill out!
Are these freezable?
Absolutely! You can freeze them either before baking or after. Just make sure to wrap them tightly.
How can I make this recipe low-carb?
Skip the biscuit dough and try using cauliflower or zucchini to create a bomb that’s still tasty without all the carbs!
📌 Pin this recipe for your next cozy dinner night!
Garlic Parmesan Cheeseburger Bombs
Ingredients
Method
- Preheat the oven according to the biscuit dough package instructions.
- Cook the ground beef in a skillet over medium heat until browned.
- Drain the fat, then mix in the minced garlic, salt, and pepper.
- Remove from heat and stir in the shredded cheddar cheese until melted.
- Roll out each piece of biscuit dough and place a spoonful of the beef and cheese mixture in the center.
- Fold the dough over the filling and seal the edges.
- Place the filled bombs on a baking sheet and sprinkle with parmesan cheese.
- Bake according to the biscuit package instructions until golden brown.
- Serve warm with your favorite dipping sauces!