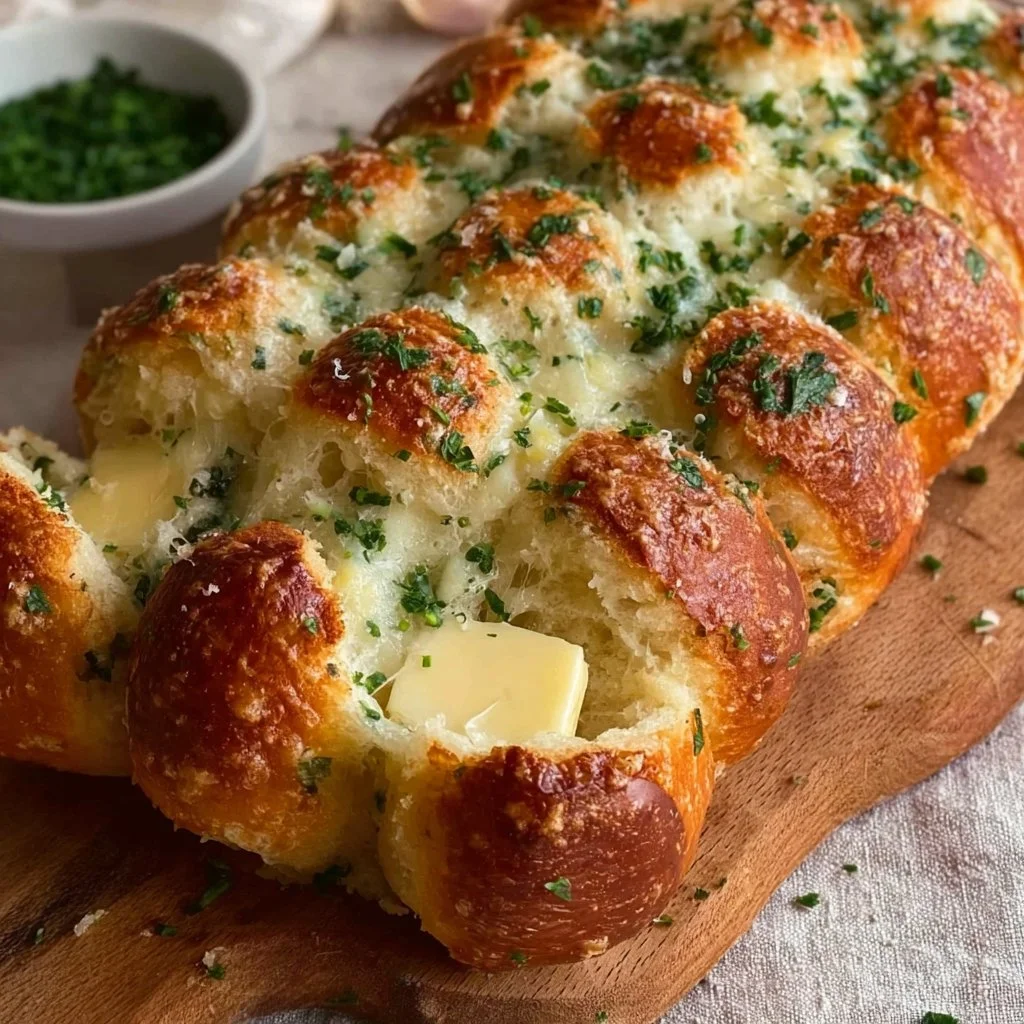
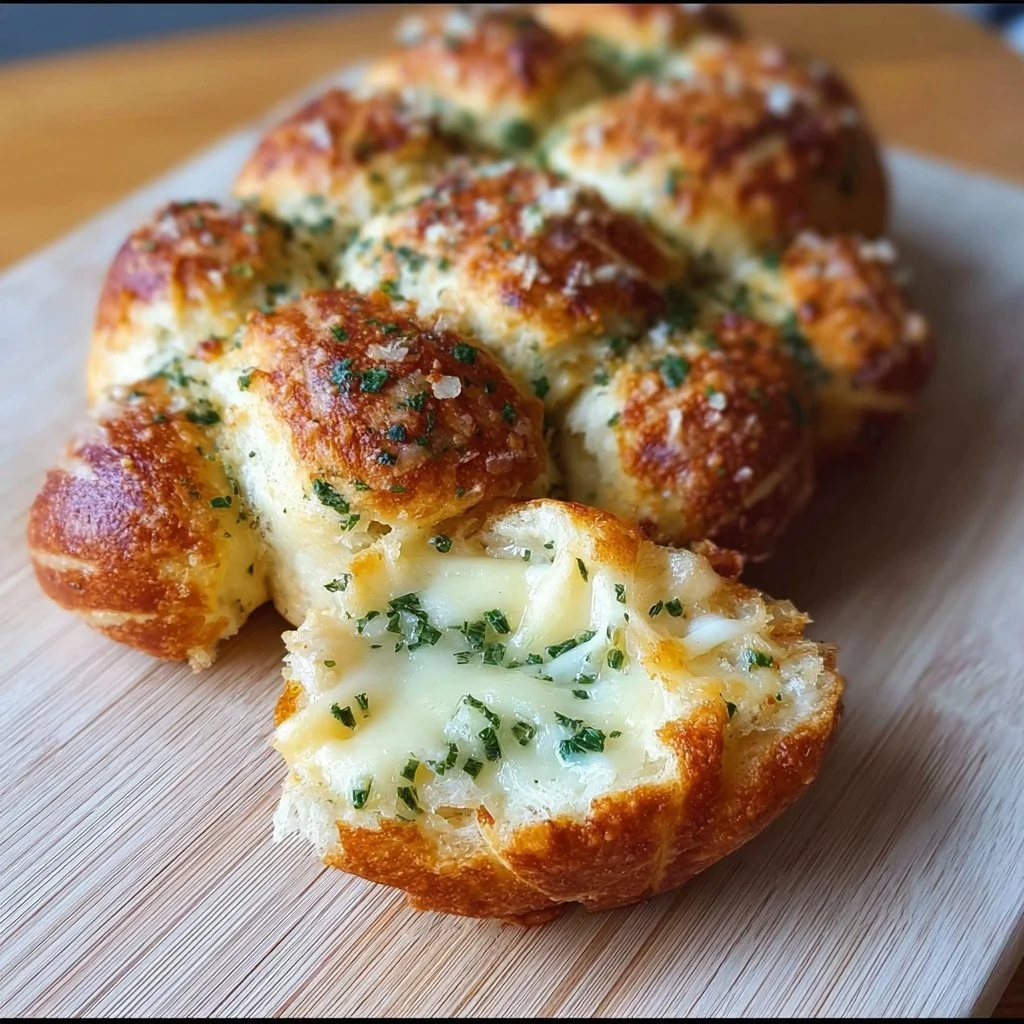
Cheesy Stuffed Garlic Bread Rolls
Ever bitten into a warm, cheesy garlic roll and thought you’d died and gone to heaven? Yeah, me too! These Cheesy Stuffed Garlic Bread Rolls are not just your average side dish; they’re a little bundle of joy wrapped in warm pizza dough. Quick, cheesy, and oh-so-satisfying, they’ll have your guests raving—and you’ll be counting down the minutes until they’re ready.
Why Make This Recipe
Here’s the thing: nobody wants to spend all evening cleaning dishes or dealing with complicated recipes. These rolls bring the flavor without the fuss, making them perfect for any occasion.
- Easy cleanup: You’re left with just a baking sheet and a mixing bowl. Boom—less stress!
- Family-friendly: Kids love cheesy stuff, and these rolls are a hit with everyone young and old.
- Versatile: Perfect as an appetizer, side dish, or even a midnight snack (no judgment here!).
Ingredients
You don’t need fancy stuff — just these basics!
- 1 package of refrigerated pizza dough
- 1 cup mozzarella cheese, shredded
- 4 tablespoons butter, melted
- 2 cloves garlic, minced
- 1 teaspoon dried oregano
- 1 teaspoon dried basil
- Salt and pepper to taste
- Marinara sauce for dipping
Directions
Let’s get rolling! Here’s how to whip these up:
- Preheat the oven to 375°F (190°C).
- Roll out the pizza dough on a floured surface and cut it into squares.
- Place a small amount of mozzarella cheese in the center of each square.
- Fold the dough over the cheese to form a ball and pinch the edges to seal.
- Place the rolls on a baking sheet lined with parchment paper.
- In a small bowl, mix melted butter, minced garlic, oregano, basil, salt, and pepper.
- Brush the garlic herb butter over the rolls.
- Bake for 15-20 minutes, or until golden brown.
- Remove from the oven and serve warm with marinara sauce for dipping.
How to Make Cheesy Stuffed Garlic Bread Rolls (Overview)
Whipping up these rolls is as simple as it gets! First, preheat your oven while you roll out that pizza dough. Cut it into squares, fill them with cheese, and seal ’em up like little pockets of happiness. Brush on that decadent garlic butter (don’t you dare skip that step—it’s life!). Bake until golden, and voilà!
Pro Tip: Let them cool slightly before digging in. I know it’s hard, but trust me—these rolls are best enjoyed warm, but not molten lava hot!
How to Serve Cheesy Stuffed Garlic Bread Rolls
These cheesy delights are not just pretty to look at; they bring flavor and aroma to any table. Serve them hot, with crispy golden tops and a sprinkle of herbs for that extra pop of color. Pair them with a side of marinara sauce for dipping, and watch the roll disappear faster than a magician’s rabbit!
How to Store Cheesy Stuffed Garlic Bread Rolls
Got leftovers? Lucky you! These rolls stay good in the fridge for about 3-4 days. Just pop them in an airtight container, and you’re set. Want to make them ahead? Freeze them for up to 2 months. When you’re ready to enjoy, just reheat them in the oven until they’re warmed through.
Tips to Make Cheesy Stuffed Garlic Bread Rolls
Here are a few tricks to level up your stuffed rolls:
- Don’t stretch the dough too thin; a little heft keeps things fluffy!
- Want to jazz it up? Mix in some chopped herbs or spices into the cheese.
- Watch the baking time closely; everyone’s oven is different. The goal is golden and bubbly, not burnt!
Variation
Feeling adventurous? Swap out the mozzarella for pepper jack and add some jalapeños for a spicy kick! You can also toss in some spinach or cooked sausage to turn these bites into a mini meal. For a vegan spin, use dairy-free cheese and vegan butter—no one will know the difference!
FAQs
Can I use homemade dough instead of refrigerated?
Absolutely! Just make sure it’s rolled out to a similar thickness for even cooking.
How do I reheat the rolls if they’ve been frozen?
Thaw in the fridge overnight, then reheat in the oven at 350°F until warmed through & crispy.
Can I make these ahead of time?
You sure can! Assemble the rolls, place them in the fridge, and bake them just before serving.
So what are you waiting for? Get your kitchen ready for a cheesy, garlicky adventure!
📌 Pin this recipe for your next cozy dinner night!
Cheesy Stuffed Garlic Bread Rolls
Ingredients
Method
- Preheat the oven to 375°F (190°C).
- Roll out the pizza dough on a floured surface and cut it into squares.
- Place a small amount of mozzarella cheese in the center of each square.
- Fold the dough over the cheese to form a ball and pinch the edges to seal.
- Place the rolls on a baking sheet lined with parchment paper.
- In a small bowl, mix melted butter, minced garlic, oregano, basil, salt, and pepper.
- Brush the garlic herb butter over the rolls.
- Bake for 15-20 minutes, or until golden brown.
- Remove from the oven and serve warm with marinara sauce for dipping.