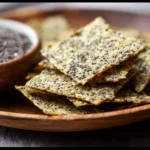
Chia Seed Crackers
Why Make This Recipe
Okay, let’s be real: if you’re looking for a healthy snack that also satisfies your crunch craving, Chia Seed Crackers are a game changer. Packed with fiber, protein, and omega-3 fatty acids, these little guys make your snack time feel a whole lot more virtuous. Plus, they’re gluten-free! So, even if you’re not on a restrictive diet, these crackers are just plain awesome.
Why bother with store-bought options filled with who-knows-what when you can whip up these wholesome bites at home? They’re super easy to make and completely customizable. You get to control what goes in—no mysterious ingredients here!
How to Make Chia Seed Crackers
Making Chia Seed Crackers is like playing with dough—except it’s a million times healthier! Here’s the good news: you don’t need fancy tools or skills. Just gather your ingredients, and let’s get cracking (pun intended)! 😊
- Combine chia seeds, almond flour, rice flour, and salt in a bowl. Mix it well; think of it as a little flour party!
- Add filtered water and blend everything into a sticky dough. If it’s a bit gooey, don’t stress; that’s just part of the charm.
- Cover the dough tightly with cling film and allow it to rest for about 25 minutes. This step is crucial—let those flavors mingle and get cozy.
- Roll out the dough between two sheets of parchment paper. Aim for a thickness of about 2 mm. Go thin, go crispy!
- Peel back the top layer of parchment and use a knife or wheel cutter to score the dough into cracker shapes. Get artsy with it!
- Pop the scored dough into an oven preheated to 160°C (320°F) or 140°C (285°F) for fan settings. Bake for around 60 minutes until firm. They’ll crisp up more once they’re cool, so keep an eye on that oven.
- Once they’re golden and firm, transfer the slab to a wire rack to cool completely. Just be patient, okay?
- Snack away immediately or stash them in an airtight container for up to 5 days.
Ingredients
- 30 g of Chia Seeds
- 100 g of Almond Flour
- 100 g of Rice Flour
- 0.5 tsp of Salt
- 130 mL of Filtered Water
How to Serve Chia Seed Crackers
So, what do you do with these crunchy delights once they’re ready? The world is your oyster! 😄
- Dips: Pair them with your favorite hummus, guacamole, or salsa.
- Toppings: Slather on some nut butter or cream cheese, then sprinkle your favorite herbs or spices.
- Charcuterie: Impress your friends during game night or wine o’clock by adding them to your charcuterie board.
Seriously, the options are endless!
How to Store Chia Seed Crackers
You actually don’t have to scarf them all down in one sitting… though it might be tempting. To keep your Chia Seed Crackers fresh:
- Airtight Container: Store them in a glass or tin container to keep them crisp for up to 5 days.
- Avoid Humidity: Keep them in a cool, dry spot. Nobody likes soggy crackers!
Tips to Make Chia Seed Crackers
Here’s the deal—if you want these bad boys to knock your socks off:
- Bake to Perfect Crispness: Don’t rush the baking. Let them get as crispy as possible for the ultimate crunch.
- Seasoning Galore: Get creative! Add spices like garlic powder, onion powder, or even some herbs to jazz them up.
- Thickness Matters: The thinner you roll them, the crispier they’ll be. So channel your inner rolling pin ninja!
Variation
Feeling adventurous? You can totally mix it up!
- Herb Infusion: Add dried herbs like rosemary or thyme into the dough for a savory kick.
- Cheesy Flavor: Mix in some nutritional yeast for a cheesy vibe without actual cheese.
- Peppery Twist: Toss in some cracked black pepper for a bit of heat.
FAQs
1. Can I use other flours?
Absolutely! You can experiment with other gluten-free flours like coconut or buckwheat. Just keep in mind that different flours may affect texture and taste.
2. How do I know when they are done baking?
They should feel firm and dry to the touch. Remember, they will crisp up a bit more as they cool, so don’t over-bake.
3. Can I freeze Chia Seed Crackers?
Yep, you can freeze them! Just make sure they’re cooled completely, then pop them in an airtight bag or container. Thaw them in the fridge or at room temperature when you’re ready to snack!
There you have it! Now you’re all set to make and enjoy delicious homemade Chia Seed Crackers. Go on, impress yourself! 🎉
Chia Seed Crackers
Ingredients
Method
- Combine chia seeds, almond flour, rice flour, and salt in a bowl and mix well.
- Add filtered water and blend everything into a sticky dough.
- Cover the dough tightly with cling film and allow it to rest for about 25 minutes.
- Roll out the dough between two sheets of parchment paper to a thickness of about 2 mm.
- Peel back the top layer of parchment and use a knife or wheel cutter to score the dough into cracker shapes.
- Pop the scored dough into an oven preheated to 160°C (320°F) or 140°C (285°F) for fan settings.
- Bake for around 60 minutes until firm; they’ll crisp up more once they are cool.
- Transfer the slab to a wire rack to cool completely.
- Pair them with your favorite dips like hummus, guacamole, or salsa.
- Slather on nut butter or cream cheese, then sprinkle with herbs or spices.
- Add them to your charcuterie board for an impressive snack.
- Store in an airtight container to keep them crisp for up to 5 days.
- Keep in a cool, dry spot to avoid sogginess.